Terraform manages the infrastructure changes using a state file, which tracks the changes made to the resources deployed to the cloud using Terraform. In other words, Terraform backend helps you store state files in a specified location.
This blog will discuss Terraform backends, their types, and how to configure them for various cloud providers, such as AWS, Azure, and GCP. You will also learn how to migrate from one backend to another, and more.
Disclaimer: All use cases of the Terraform backend discussed here work similarly in OpenTofu, the open-source Terraform alternative. However, to keep it simple and familiar for DevOps engineers, we will use “Terraform backend” as a catch-all term throughout this blog post.
What is Terraform Backend
Terraform provides a backend configuration block to store and manage the state file of your Terraform code.
Using the backend, state files can be stored either locally or in a centralized remote location, depending on the size and requirements of the engineering team responsible for the structure.
You can configure this remote backend on your own in your Terraform code to store your state file in cloud provider storage, such as AWS S3 bucket, Azure Blob Storage, or Google Cloud Storage. Once the configuration is done, it is visible in the storage and can be easily accessed via the console.
Thus, whenever Terraform CLI commands such as [.code]plan[.code], and [.code]apply[.code] are performed to provision or manage the cloud infrastructure, the state file in the backend is updated.
Common Use Cases of Terraform Backend
Terraform backend is used among teams as a de facto practice due to its benefits, such as versioning, state locking, etc. For example:
- Teams can easily collaborate on the same Terraform configuration with the centralized state file storage, which helps prevent any misconfiguration or merge conflicts.
- If the infrastructure is down due to some configuration changes, it can be easily recovered using the backend state file.
- Infrastructure changes can be easily audited with the state file’s change history, which helps with quick troubleshooting and tracking changes.
- Teams can use state locking to avoid merge conflicts when multiple engineers work simultaneously, and employ encryption to secure the state file.
Types of Terraform Backends
There are two types of Terraform backends: local and remote. Let’s learn more about them in this section.
Local Backend
By default, the local backend configuration stores the state file in the same directory as the Terraform code. You can easily find the state file, terraform.tfstate, in your current working directory. In this case, since you are the only user, it makes sense to use the local backend to store your state file.
Remote Backend
Once you have developed the infrastructure and added more contributing developers, you should start using a remote backend. The remote backend configuration stores the state file in a centralized and secure location, such as a cloud-based storage service (S3) or Terraform cloud.
In case multiple team members need to access and update the same state file, using a state backend such as S3 with DynamoDB comes in handy for state locking and preventing merge conflicts.
The remote backend offers collaboration features like versioning, state locking, state file encryption, etc.
- Versioning: The versioning of the state files helps with easy rollbacks in case of a failure when the new changes are deployed.
- State locking: Prevents conflicts resulting from multiple team members simultaneously applying changes to the same state file.
- Encryption: State files store not only the resource configuration but also sensitive information, such as credentials or URLs. State file encryption ensures that the information is secure.
To summarize, here is a quick look at the difference between the two types of Terraform backends.
Terraform Backend Configuration for Different Cloud Providers
When you are working with different cloud providers such as AWS, Azure, or GCP, they use their own cloud storage to store the state file.
The configuration is passed using the Terraform code, and when initialized, the backend for your Terraform state file management is set to remote. Let’s see how you can define Terraform backend configuration for various public cloud providers.
AWS S3 Backend
When you define a Terraform backend with S3 storage and pass the key arguments, it looks like so:
terraform {
  backend "s3" {
    bucket = "env0-terraform-state-bucket"
    key    = "env0/terraform.tfstate"
    region = "us-east-1"
    encrypt = true
  }
}
Let’s break down the above Terraform config arguments:
- [.code]bucket[.code]: This is the name of your s3 bucket where the state file is stored. Ensure that it exists before configuring your backend with proper access permission and that versioning is enabled.
- [.code]key[.code]: This is the path to your state file inside your S3 bucket.
- [.code]region[.code]: To find your S3 bucket, backend needs the region of your S3 bucket that stores your state file.
- [.code]encrypt[.code]: If you want to enable server-side encryption for the state file, pass the value as ‘true.’ Otherwise, the default value is set to ‘false’.
Azure Blob Storage Backend
Create your Terraform backend configuration with Azure Blob Storage by passing these key arguments:
terraform {
  backend "azurerm" {
    resource_group_name   = "env0-terraform-rg"
    storage_account_name  = "env0terraformstate"
    container_name        = "state"
    key                   = "env0/terraform.tfstate"
  }
}
Let’s break down the above config to understand it better:
- [.code]resource_group_name[.code]: This is the name of the resource group in which the storage account exists.
- [.code]storage_account_name[.code]: This is the name of your Azure Storage account. Ensure that you already have created one.
- [.code]container_name[.code]: This lets you pass the container or blob name within your storage account to store your state file.
- [.code]key[.code]: This is the path to your state file within your container.
GCS (Google Cloud Storage) Backend
The Terraform backend configuration with GCS has 3 key arguments:
terraform {
  backend "gcs" {
    bucket = "env0-terraform-state-bucket"
    prefix = "env0/terraform.tfstate"
    credentials = "path/to/service-account.json"
  }
}
Explaining the above backend:
- [.code]bucket[.code]: This is the name of your Google storage bucket that stores your state file. Ensure that the bucket already exists. Enable versioning for a quick disaster recovery.
- [.code]prefix[.code]: This is the path where you want to store your state file.
- [.code]credentials[.code]: Pass the path to the service account JSON file or environment variable, such as ‘GOOGLE_APPLICATION_CREDENTIALS’, for authentication. Ensure the service account has the ‘storage.objects.create’ and ‘storage.objects.get’ permissions.
By now, you know how to write a Terraform backend configuration file for various cloud providers. Next, let’s see how you can define your S3 remote backend.
Example: Configuring Terraform Backend Block in AWS
Now, let’s look at an example of using an AWS S3 bucket to store your Terraform state file using a Terraform backend configuration to manage your state file.
Define AWS S3 Bucket
First, define your AWS provider and S3 bucket in your main.tf file:
provider "aws" {
  region     = "us-east-1"
}
resource "aws_s3_bucket" "terraform_state" {
  bucket = "env0-terraform-state-bucket"
  lifecycle {
    prevent_destroy = true
  }
  tags = {
    Name        = "Terraform State Bucket"
  }
}
In the above code, while defining the [.code]aws_s3_bucket[.code] name ‘env0-terraform-state-bucket’, we have provided the [.code]prevent_destroy[.code] as true.
This prevents any accidental deletion of the S3 bucket, since it will store the Terraform state file. In order to delete this bucket, you would need to disable the [.code]prevent_destroy[.code] by passing its value as ‘false’.
Enable S3 Versioning and Encryption
To make the most of the remote state, you can enable S3 bucket versioning for easy rollbacks and disaster recovery. By encrypting your bucket, you can also secure your state file from any unauthorized access risk and align it with compliance.
resource "aws_s3_bucket_versioning" "state_bucket_versioning" {
  bucket = aws_s3_bucket.terraform_state.id
  versioning_configuration {
    status = "Enabled"
  }
}
resource "aws_kms_key" "state_bucket_key" {
  description             = "This key is used to encrypt bucket objects"
  deletion_window_in_days = 10
}
resource "aws_s3_bucket_server_side_encryption_configuration" "state_bucket_encryption" {
  bucket = aws_s3_bucket.terraform_state.id
  rule {
    apply_server_side_encryption_by_default {
      kms_master_key_id = aws_kms_key.state_bucket_key.arn
      sse_algorithm     = "aws:kms"
    }
  }
}
Here, the KMS key is used to encrypt the S3 bucket, which, when deleted, will persist for 10 days. During this time you can restore the KMS key.
The key point to remember is that since bucket ID is used by both [.code]aws_s3_bucket_versioning[.code] and [.code]aws_s3_bucket_server_side_encryption_configuration[.code] resources, there is an internal dependency on the S3 bucket.
This means that versioning and encryption resources are deployed only after the ‘env0-terraform-state-bucket’ bucket is created.
Enable State Locking
Next, define a DynamoDB in your main.tf file, which allows the state-locking mechanism on your Terraform state file:
resource "aws_dynamodb_table" "terraform_locks" {
  name           = "terraform-locks"
  billing_mode   = "PAY_PER_REQUEST"
  hash_key       = "LockID"
  attribute {
    name = "LockID"
    type = "S"
  }
  tags = {
    Name        = "Terraform Lock Table"
  }
}
Using the above DynamoDB configuration, only one team member can perform the Terraform operations such as [.code]plan[.code] and [.code]apply[.code] on your state file. This helps prevent resource configuration conflicts or corruption, which running simultaneous Terraform commands might cause.
Deploy Terraform Configuration
Once your Terraform configurations are done, run the [.code]terraform init[.code] command to initialize your provider plugins and modules:
➜  env0 git:(main) ✗ terraform init
Initializing the backend...
Initializing provider plugins...
- Installing hashicorp/aws v5.76.0...
- Installed hashicorp/aws v5.76.0 (signed by HashiCorp)

Terraform has made some changes to the provider dependency selections recorded
in the .terraform.lock.hcl file. Review those changes and commit them to your
version control system if they represent changes you intend to make.
Terraform has been successfully initialized!
You can review the deployment resources and their changes by running the [.code]terraform plan[.code] command:
➜  env0 git:(main) ✗ terraform plan
…
  + resource "aws_dynamodb_table" "terraform_locks" {
      + billing_mode     = "PAY_PER_REQUEST"
      + hash_key         = "LockID"
…
  + resource "aws_kms_key" "state_bucket_key" {
      + is_enabled                         = true
      + bypass_policy_lockout_safety_check = false
…
  + resource "aws_s3_bucket" "terraform_state" {
      + bucket                      = "env0-terraform-state-bucket"
      + force_destroy               = true
…
  + resource "aws_s3_bucket_server_side_encryption_configuration" "state_bucket_encryption" {
      + rule {
          + apply_server_side_encryption_by_default {
              + sse_algorithm     = "aws:kms"
…
  + resource "aws_s3_bucket_versioning" "state_bucket_versioning" {
          + status     = "Enabled"
…
Plan: 5 to add, 0 to change, 0 to destroy.
After reviewing the deployment changes, run the [.code]terraform apply --auto-approve[.code] command. After giving the plan as an output, it will deploy your infrastructure without requiring manual ‘yes’ or ‘no’ input.
➜  env0 git:(main) ✗ terraform apply --auto-approve
  + resource "aws_dynamodb_table" "terraform_locks" {
…
  + resource "aws_kms_key" "state_bucket_key" {
…
  + resource "aws_s3_bucket" "terraform_state" {
…
  + resource "aws_s3_bucket_server_side_encryption_configuration"
…
  + resource "aws_s3_bucket_versioning" "state_bucket_versioning" {
…
Plan: 5 to add, 0 to change, 0 to destroy.
aws_kms_key.state_bucket_key: Creating...
aws_dynamodb_table.terraform_locks: Creating...
aws_s3_bucket.terraform_state: Creating...
aws_kms_key.state_bucket_key: Creation complete after 1s [id=6d1b2022-7ae4-4175-acb4-0c010e0fe11f]
aws_s3_bucket.terraform_state: Creation complete after 4s [id=env0-terraform-state-bucket]
aws_s3_bucket_versioning.state_bucket_versioning: Creating...
aws_s3_bucket_server_side_encryption_configuration.state_bucket_encryption: Creating...
aws_s3_bucket_server_side_encryption_configuration.state_bucket_encryption: Creation complete after 1s [id=env0-terraform-state-bucket]
aws_s3_bucket_versioning.state_bucket_versioning: Creation complete after 2s [id=env0-terraform-state-bucket]
aws_dynamodb_table.terraform_locks: Creation complete after 8s [id=terraform-locks]
Apply complete! Resources: 5 added, 0 changed, 0 destroyed.
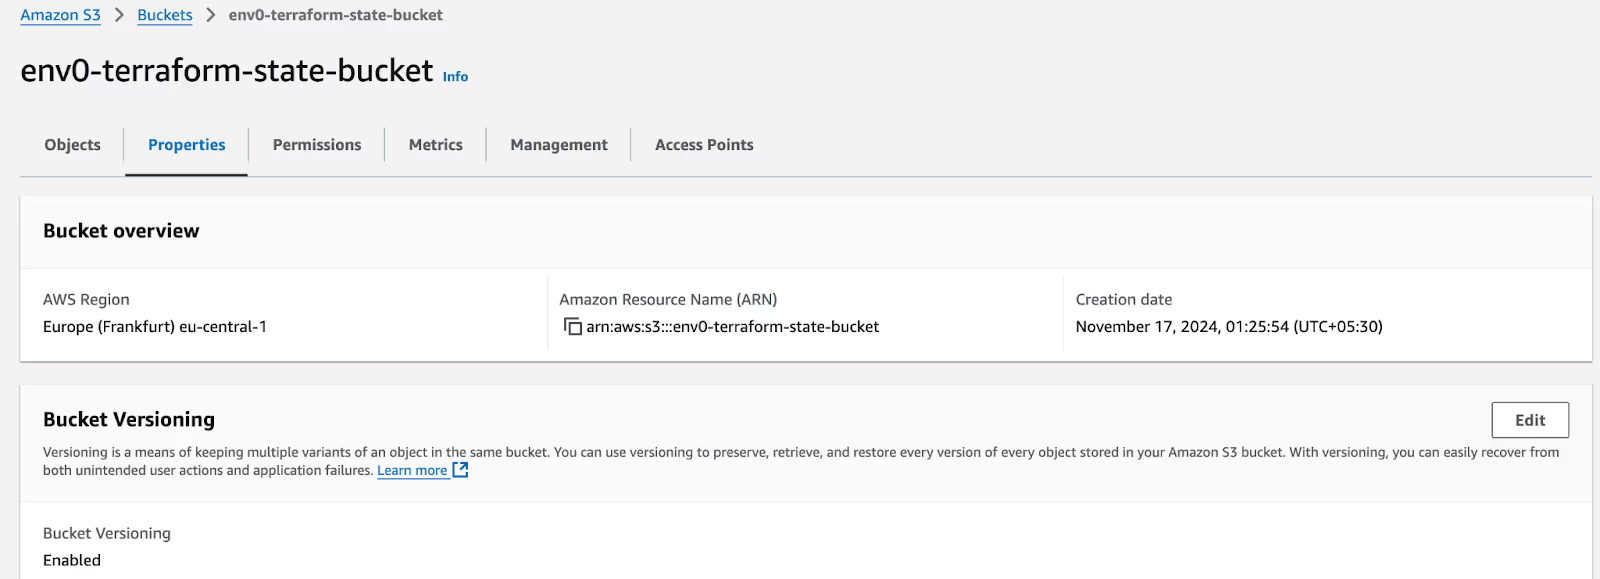
You can verify the creation of the S3 bucket and its configuration using the AWS console.
Terraform Backend Configuration
Next, let’s configure the Terraform backend configuration in the main.tf file.
terraform {
  backend "s3" {
    bucket         = “"env0-terraform-state-bucket"”
    key            = "terraform.tfstate"
    region         = "us-east-1"
    dynamodb_table = "terrateam-state-lock-01"
    encrypt        = true
  }
}
Make sure that you pass the bucket name in the backend configuration, since it does not allow variables.
Next, run the [.code]terraform init[.code] command to ensure that the “s3” backend is initialized. In case you pass the bucket name using [.code]aws_s3_bucket[.code] reference to your Terraform backend config, it throws an error, like so:
➜  env0 git:(main) ✗ terraform init
Initializing the backend...
╷
│ Error: Variables not allowed
│
│   on iam_aws_1.tf line 67, in terraform:
│   67:     bucket         = aws_s3_bucket.terraform_state.id
│
│ Variables may not be used here.
When you run the [.code]terraform init[.code] command with the hardcoded string values in the arguments for the Terraform backend configuration block, your output is like so:
➜  env0 git:(main) ✗ terraform init
Initializing the backend...
Acquiring state lock. This may take a few moments...
Do you want to copy existing state to the new backend?
  Pre-existing state was found while migrating the previous "local" backend to the
  newly configured "s3" backend. No existing state was found in the newly
  configured "s3" backend. Do you want to copy this state to the new "s3"
  backend? Enter "yes" to copy and "no" to start with an empty state.
  Enter a value: no
Releasing state lock. This may take a few moments...
Successfully configured the backend "s3"! Terraform will automatically
use this backend unless the backend configuration changes.
Initializing provider plugins...
- Reusing previous version of hashicorp/aws from the dependency lock file
- Using previously-installed hashicorp/aws v5.76.0
Terraform has been successfully initialized!
Here, when asked if you want to copy your local backend or start fresh, choose ‘no’.
Remember, you have deployed our S3 bucket and DynamoDB configurations using Terraform code. In your project directory, a terraform.tfstate file is created using the default local backend.
You would like to only use your ‘s3’ Terraform backend to track your configuration changes and dispose of your local backend.
Since you chose to start with an empty state, your S3 bucket without a state file is created and looks like so:
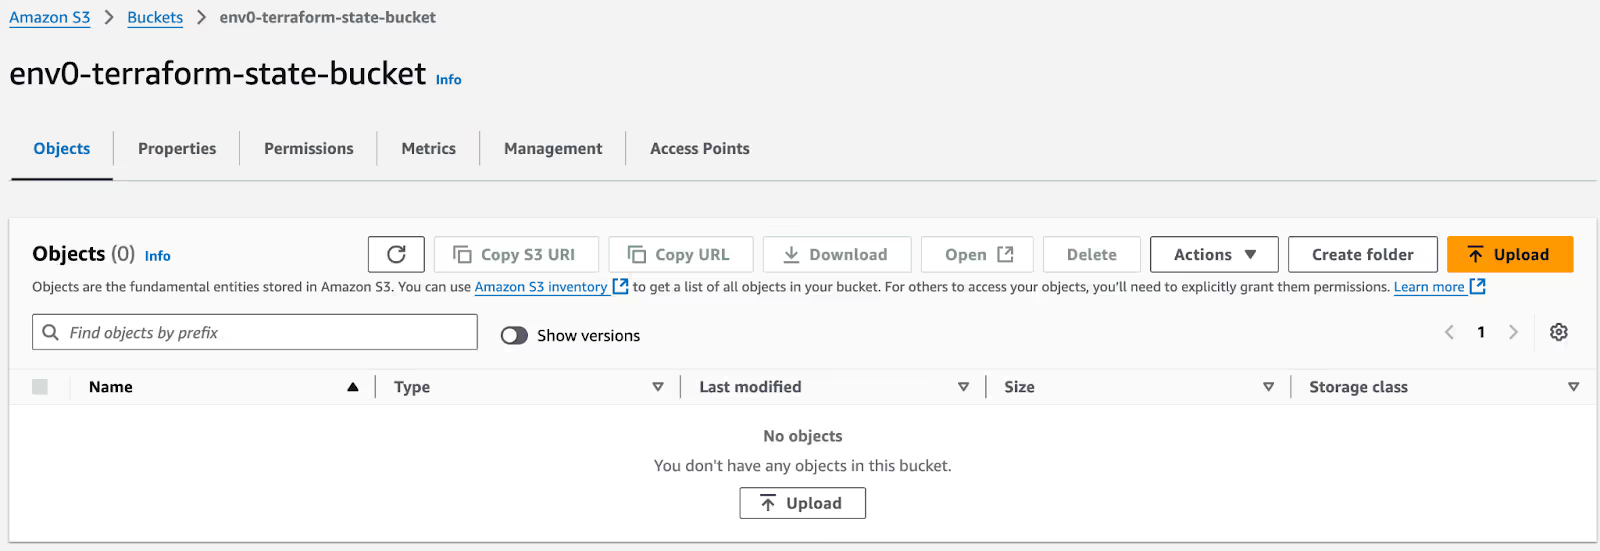
If you run the [.code]terraform apply[.code] command now, it would show that you have some already existing resources, such as S3 bucket and DynamoDB, which your ‘s3’ backend state is trying to create.
To avoid such resource duplication problems, you can either delete the Terraform code for your DynamoDB and S3 bucket or migrate your local backend to the remote ‘s3’ backend during the Terraform initialization.
Migrating State From Local to Remote Backend
By default, it is recommended that teams use the remote backend to store their state file from the initial infrastructure provisioning.
However, sometimes there might be some local state files that need to migrate after a successful run, or the code is ready to be deployed in a dev environment. Let’s see how it can be done.
Continuing on the previous example, Terraform detects that you have a state file named terraform in your current working directory named terraform.tfstate. Now, run the [.code]terraform init[.code] command for the Terraform backend configuration to initialize the backend.
➜  env0 git:(main) ✗ terraform init
Initializing the backend...
Acquiring state lock. This may take a few moments...
Do you want to copy existing state to the new backend?
  Pre-existing state was found while migrating the previous "local" backend to the
  newly configured "s3" backend. No existing state was found in the newly
  configured "s3" backend. Do you want to copy this state to the new "s3"
  backend? Enter "yes" to copy and "no" to start with an empty state.
  Enter a value: yes
Releasing state lock. This may take a few moments...
Successfully configured the backend "s3"! Terraform will automatically
use this backend unless the backend configuration changes.
Initializing provider plugins...
- Reusing previous version of hashicorp/aws from the dependency lock file
- Using previously-installed hashicorp/aws v5.76.0
Terraform has been successfully initialized!
In the above output, running the terraform [.code]init [.code]command, enabled Terraform to lock on the new backend file and prompted you to provide input. In case you would like to migrate your state file to the newly configured ‘s3’ remote backend.
Choosing ‘yes’ releases the lock from the ‘s3’ backend after having moved your state file there.
Moving forward, the ‘s3’ backend will track your changes and infrastructure changes.
With that, your backend migration is complete, and your Terraform configuration has been successfully initialized. You can verify this using the AWS console that displays the new state file.

You can also take a local backup of your state file by running the [.code]terraform state pull > local-state.json[.code] command. It stores your state file in a local-state.json file on your local machine.
Remember, you should not modify your state file manually. This can cause state corruption or infrastructure inconsistencies.
As a DevOps Engineer, configuring the Terraform backend, access control, versioning, and locking mechanism to ensure the security, compliance, and backup recovery hinders the productivity of your team.
After configuring your backend, your changes will also be applied to your remote state file. This takes a lot of bandwidth, leaves margin for error, and requires frequent checks. You would also need to occasionally switch between backends to run any POCs on your current configuration. Easier and more efficient automation of these processes can be done with tools such as env0, as we'll see below.
Terraform Backend with env0
env0 provides a remote backend to facilitate secure and streamlined team collaboration, which creates a foundation for a unified deployment process across the organization and enables many other governance, automation, and visibility features. .
If needed, the platform also offers a bring your own bucket (BYOB) option for teams who prefer to manage their state files in their hosted environments.
To use the env0 remote state, you can easily integrate your Terraform code with the env0 platform.
All you need to do is enable ‘Use env0 remote backend’ while creating a new environment for integration. This allows env0 to take care of your Terraform remote backend configuration automatically with versioning, access controls, and a state locking mechanism in place.
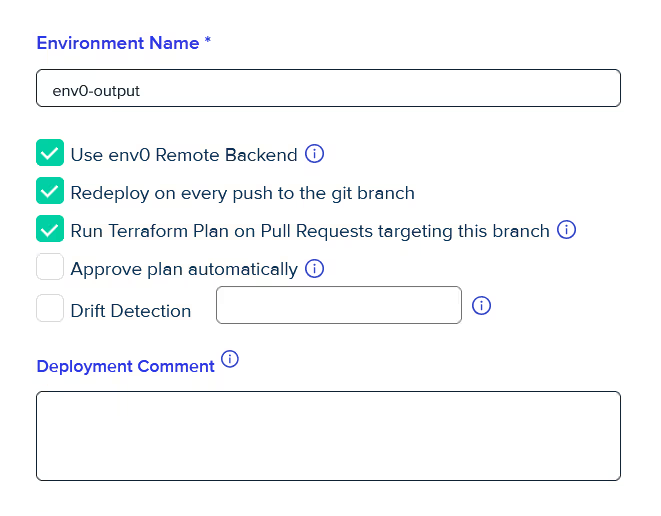
Once the integration is done, you can find your remote state under ‘STATES ‘ in your env0 console, along with creation time and ID. You can even download your state file as a .tfstate file.

Now, team members can use their local setup to run the remote [.code]plan[.code] and [.code]apply[.code]. To enable this, navigate to the ‘SETTINGS’ in your environment, and check box the ‘Allow Remote Apply’.
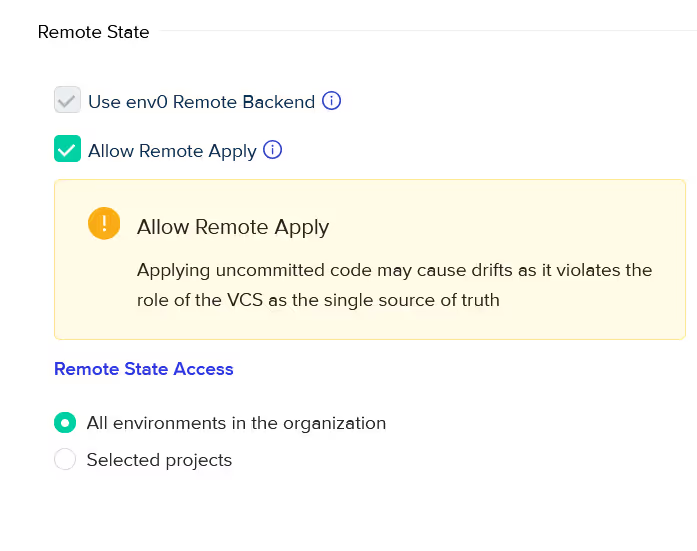
Let’s see how you can run the Terraform [.code]apply[.code] from your local to remote.
First, add the Terraform cloud configuration block in your Terraform code and create a new S3 resource:
terraform {
  cloud {
	hostname 	= "backend.api.env0.com"
	organization = "81b8f9f3-6542-417b-a2b8-e8120df3a2a2.4fab912f-8565-459b-b367-ed8a5a5fd933"
	workspaces {
  	name = "env0-test-null-34440991"
	}
  }
}
resource "aws_s3_bucket" "env0_bucket_04" {
  bucket = "s03-tf-bucket"
  acl	= "private"
}
Next, do a terraform backend login with the remote state ID and then run the [.code]terraform init[.code] and [.code]terraform apply --auto-approve[.code] command.
➜  env0 git:(main) ✗  terraform apply --auto-approve
Running apply in HCP Terraform. Output will stream here. Pressing Ctrl-C
will cancel the remote apply if it's still pending. If the apply started it
will stop streaming the logs, but will not stop the apply running remotely.
Preparing the remote apply...
…
Remote Apply initialized successfully!
downloading and extracting local code
…
reading Terraform Variables...
Terraform Variables:
    	vpc_config={
…
reading Environment Variables...
Environment Variables:
    	ENV0_CLI_ARGS_APPLY=-auto-approve="true"
…
> /opt/tfenv/bin/terraform --version
Terraform v1.5.7
…
> /opt/tfenv/bin/terraform init
…
Terraform has been successfully initialized!
Go to the ‘DEPLOYMENT’ tab on the nv0 console to check the status of your deployment. To get more information on your deployment, check the ‘DEPLOYMENT-LOGS’.

As we’ve seen above, env0’s managed remote backend is easily enabled by checking the ‘Use env0 Remote Backend’ from UI, and everything simply works.
There’s no need to spend your time writing the infrastructure code or going through the trouble of creating and managing the remote backend, including backup, replication, high availability, encryption, and locking.
Teams can expedite development cycles by running the [.code]plan[.code] (and event [.code]apply[.code]) locally while executing them remotely, which allows the local changes to run with the shared backend and could be useful for quick debugging
Conclusion
By now, you should have a clear understanding of Terraform backends and if you want to use a local backend or a remote one. We looked at how to write Terraform backend configuration for Azure Blob, AWS S3, or GCS. Additionally, now you can easily migrate your state file from a local to a remote one.
Remote Terraform backends are the preferred option across organizations and large teams. They also enable features, such as versioning, state locking mechanism, and encryption, allowing a secure, compliant, and recoverable state file.
Frequently Asked Questions
Q. What is the backend of Terraform?
Terraform backend is used to define where your state file will be stored and how you can run Terraform operations on it. It can be on public cloud providers, local, or Terraform Cloud.
Q. What is the default local backend in Terraform?
The default local backend in Terraform is your local machine. When you initialize and plan your Terraform code without any backend, it is stored in your current working directory and named as a terraform.tfstate file.
Q. What is the difference between Terraform backend remote and cloud?
The remote backend is used to store the state file on remote cloud storage services such as S3, GCS, or Azure blob, with a state locking mechanism. Conversely, cloud backend uses Terraform Cloud to store state and provide additional features like remote execution, state versioning, and team collaboration capabilities.
Q. How to move the Terraform state file from one backend to another?
To move your state file from one backend to another, update your Terraform backend configuration in Terraform code. Next, run the [.code]terraform init -migrate-state[.code] command. When prompted, confirm and apply the migration. Finally, review that the migration is completed using the AWS console.


.webp)


