

Imagine managing your cloud infrastructure using the programming languages you already love—Python, Go, JavaScript, you name it. No more wrestling with YAML, JSON, or HCL (HashiCorp Configuration Language) files!
Pulumi gives you that power, offering a robust CLI and service backend to manage both state and secrets. It's like the Swiss Army knife for cloud infrastructure, supporting all the major providers like AWS, Azure, and Google Cloud.
Today we're diving into the world of Pulumi and its integration with env0. We'll explore what Pulumi is, its features, how to set it up, and even throw in a real-world example (provisioning an EKS cluster). Also, we’ll weigh the pros against the cons and look at how it stacks up against other options. So buckle up; this is going to be a fun ride!
Video Walk-through
Requirements:
- A GitHub account
- An AWS account
- An env0 account
- A Pulumi account
TL;DR: You can find the main repo here.
What is Pulumi?
Pulumi is an open source Infrastructure-as-Code (IaC) framework that provisions resources utilizing common programming languages. Pulumi also supports the major cloud providers: AWS, Azure, and Google Cloud. Its leaning on common languages eliminates the time it would otherwise take to get used to a new domain-specific language like HCL.
If you're wondering how it stacks up against Terraform, check out my previous blog comparing Pulumi vs. Terraform. But the main benefits come in three main cores: the Pulumi SDK(s), the service backend, and finally the automation API.
Pulumi SDKs
First up, the SDKs. Pulumi's SDKs are what make it super versatile. These SDKs allow you to use languages like Python, JavaScript, TypeScript, Go, or .NET for defining and deploying your infrastructure. This is super cool because it means you can use the same language you're already comfortable with for your application development.
That all means that you end up with the following advantages: strong familiarity with the core languages, a long list of library resources (according to language), and reusable custom abstractions.
Pulumi Service Backend
Pulumi's SaaS offering comes replete with CI/CD integrations, Policy-as-Code, role-based access, and state management.
State Management – Safely stores and manages the state of your infrastructure. This means less headache worrying about where your infrastructure's "truth" lives. There is also an option for self-managed state through your own cloud account on AWS, Azure, or GCP.
Collaboration Features – You can collaborate with your team on infrastructure updates, with features like RBAC, stacks history, and more.
Policy-as-Code – Enforce security, compliance, and best practices across your infrastructure using Pulumi’s Policy as Code offering called CrossGuard.
CI/CD Integration – Pulumi CI/CD integrations work with popular systems like GitHub Actions, GitLab CI, Jenkins, TravicCI, AWS Code Services, Azure DevOps, and more.
Automation API
This Automation API can embed Pulumi directly into your application code, offering a hassle-free way to manage infrastructure.
In essence, this concept encapsulates the core functionalities offered by the Pulumi Command Line Interface (CLI), such as executing commands like [.code]pulumi up[.code], [.code]pulumi preview[.code], [.code]pulumi destroy[.code], and [.code]pulumi stack init[.code].
However, it extends beyond this by offering enhanced flexibility and control. This approach is designed to be strongly typed and secure, facilitating the use of Pulumi within embedded environments, for instance, within web servers.
Importantly, this method eliminates the need for running the CLI through a shell process, streamlining operations, and integrating infrastructure management more seamlessly into application environments.
Pulumi Features
Alright, let’s dig into some of the Pulumi concepts and features that it offers:
1. Component Resources
Pulumi lets you define reusable building blocks known as "component resources." These are like your typical cloud resources but bundled with additional logic. If you are familiar with Terraform, these would be your modules.
2. Stack References
Manage dependencies between multiple Pulumi stacks effortlessly. This feature is a real game-changer for managing infrastructure at scale.
3. Templates and Packages
Think of these as the ultimate cheat codes for your IaC. Instead of starting from scratch, you can kick things off with a pre-baked setup. Here’s why they're great:
- Speedy Setup: No more blank-slate syndrome. You’ve got a starting point that’s not just a blank file – it’s a springboard that gets you coding your infra in record time.
- Best Practices: These templates aren't just thrown together – they're crafted with best practices in mind. So you're not just starting faster, you're starting smarter.
- Learning Resources: New to Pulumi or a particular cloud service? Templates can be great learning tools, showing you the ropes of how things are structured and pieced together.
How to Install Pulumi
Alright, time to get our hands dirty. Installing Pulumi is a breeze. You can reference this from Pulumi's documentation.
Since I'm running this in my Windows for Subsystem Linux environment, I can run the install script as shown:
Pulumi Stack Example
Let's get into the meat and potatoes: stacks. A Pulumi stack is essentially an isolated, independently configurable instance of a Pulumi program. Let's first work with the Pulumi CLI then later we'll see how to use env0.
Create a New Pulumi Project
First, create a Pulumi project by creating a new directory and running the [.code]pulumi new[.code] command with the [.code]kubernetes-aws-python[.code] Pulumi template.
Continue by providing a project name, description, and stack name along with the AWS region and some other parameters.
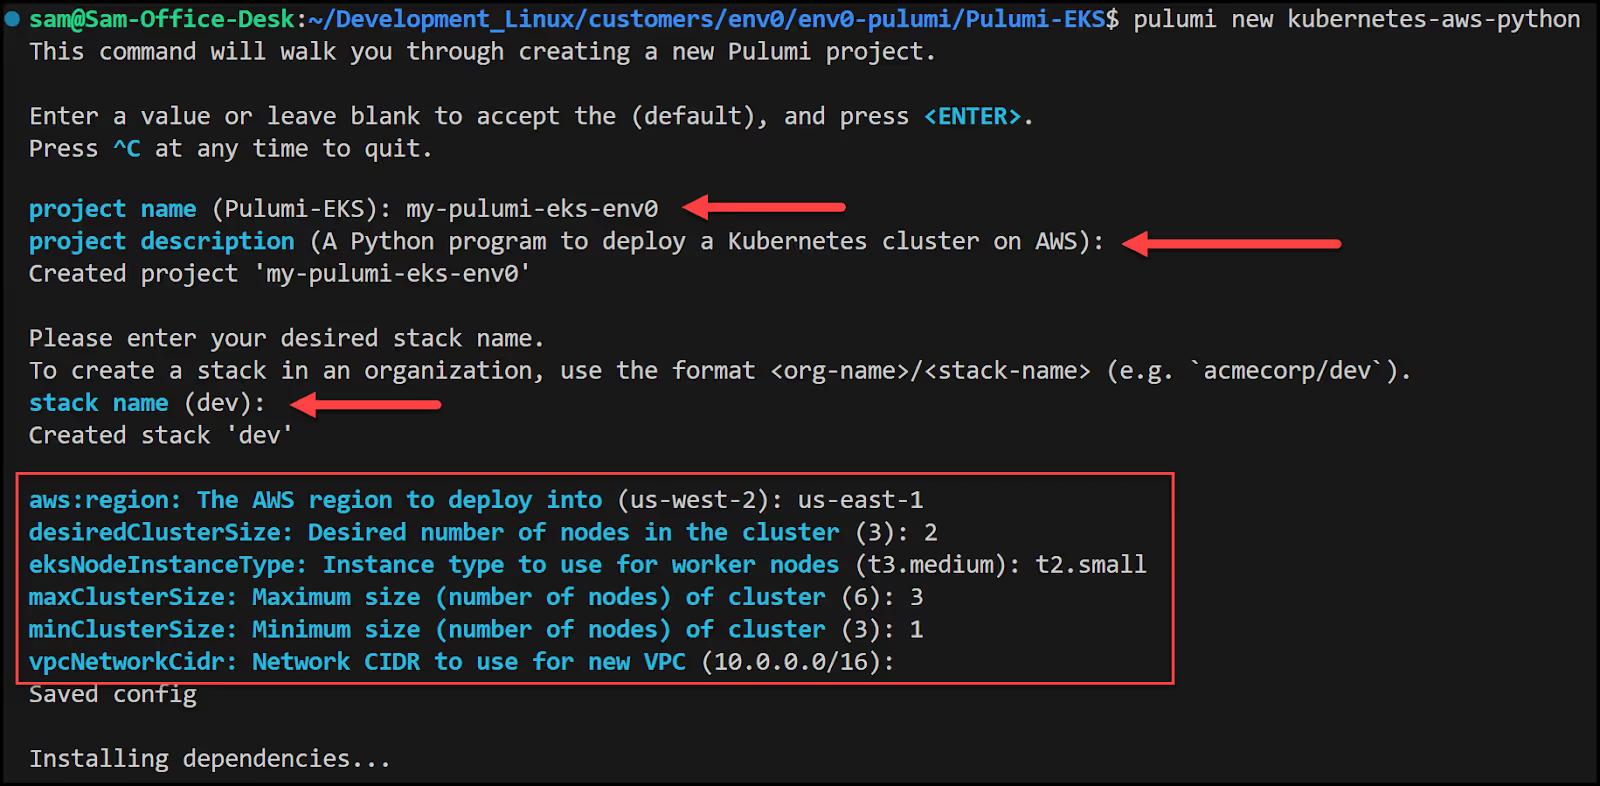
Pulumi installs the necessary dependencies and your new project is ready.

Run Pulumi
Next, make sure you export your AWS cloud credentials as environment variables and run [.code]pulumi up[.code].
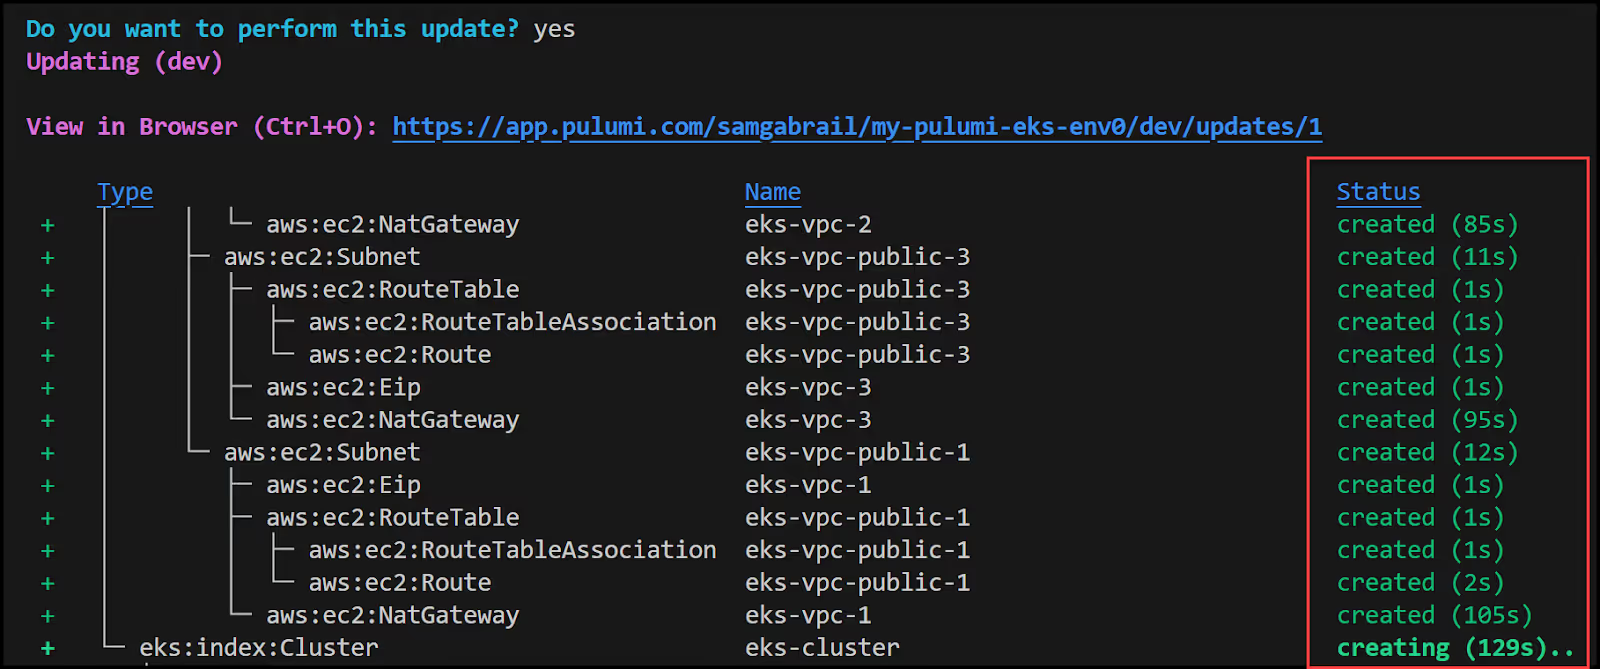
Read what Pulumi is about to do, then answer [.code]yes[.code] when asked if you want to perform this update.

Now, Pulumi will start to provision resources and you will see the resources get created in the terminal as shown below.
Observe the Output Results
If all goes well, you should have your new EKS cluster up and running. You can also check the Pulumi UI for your new stack where you can view all the resources created along with the output.
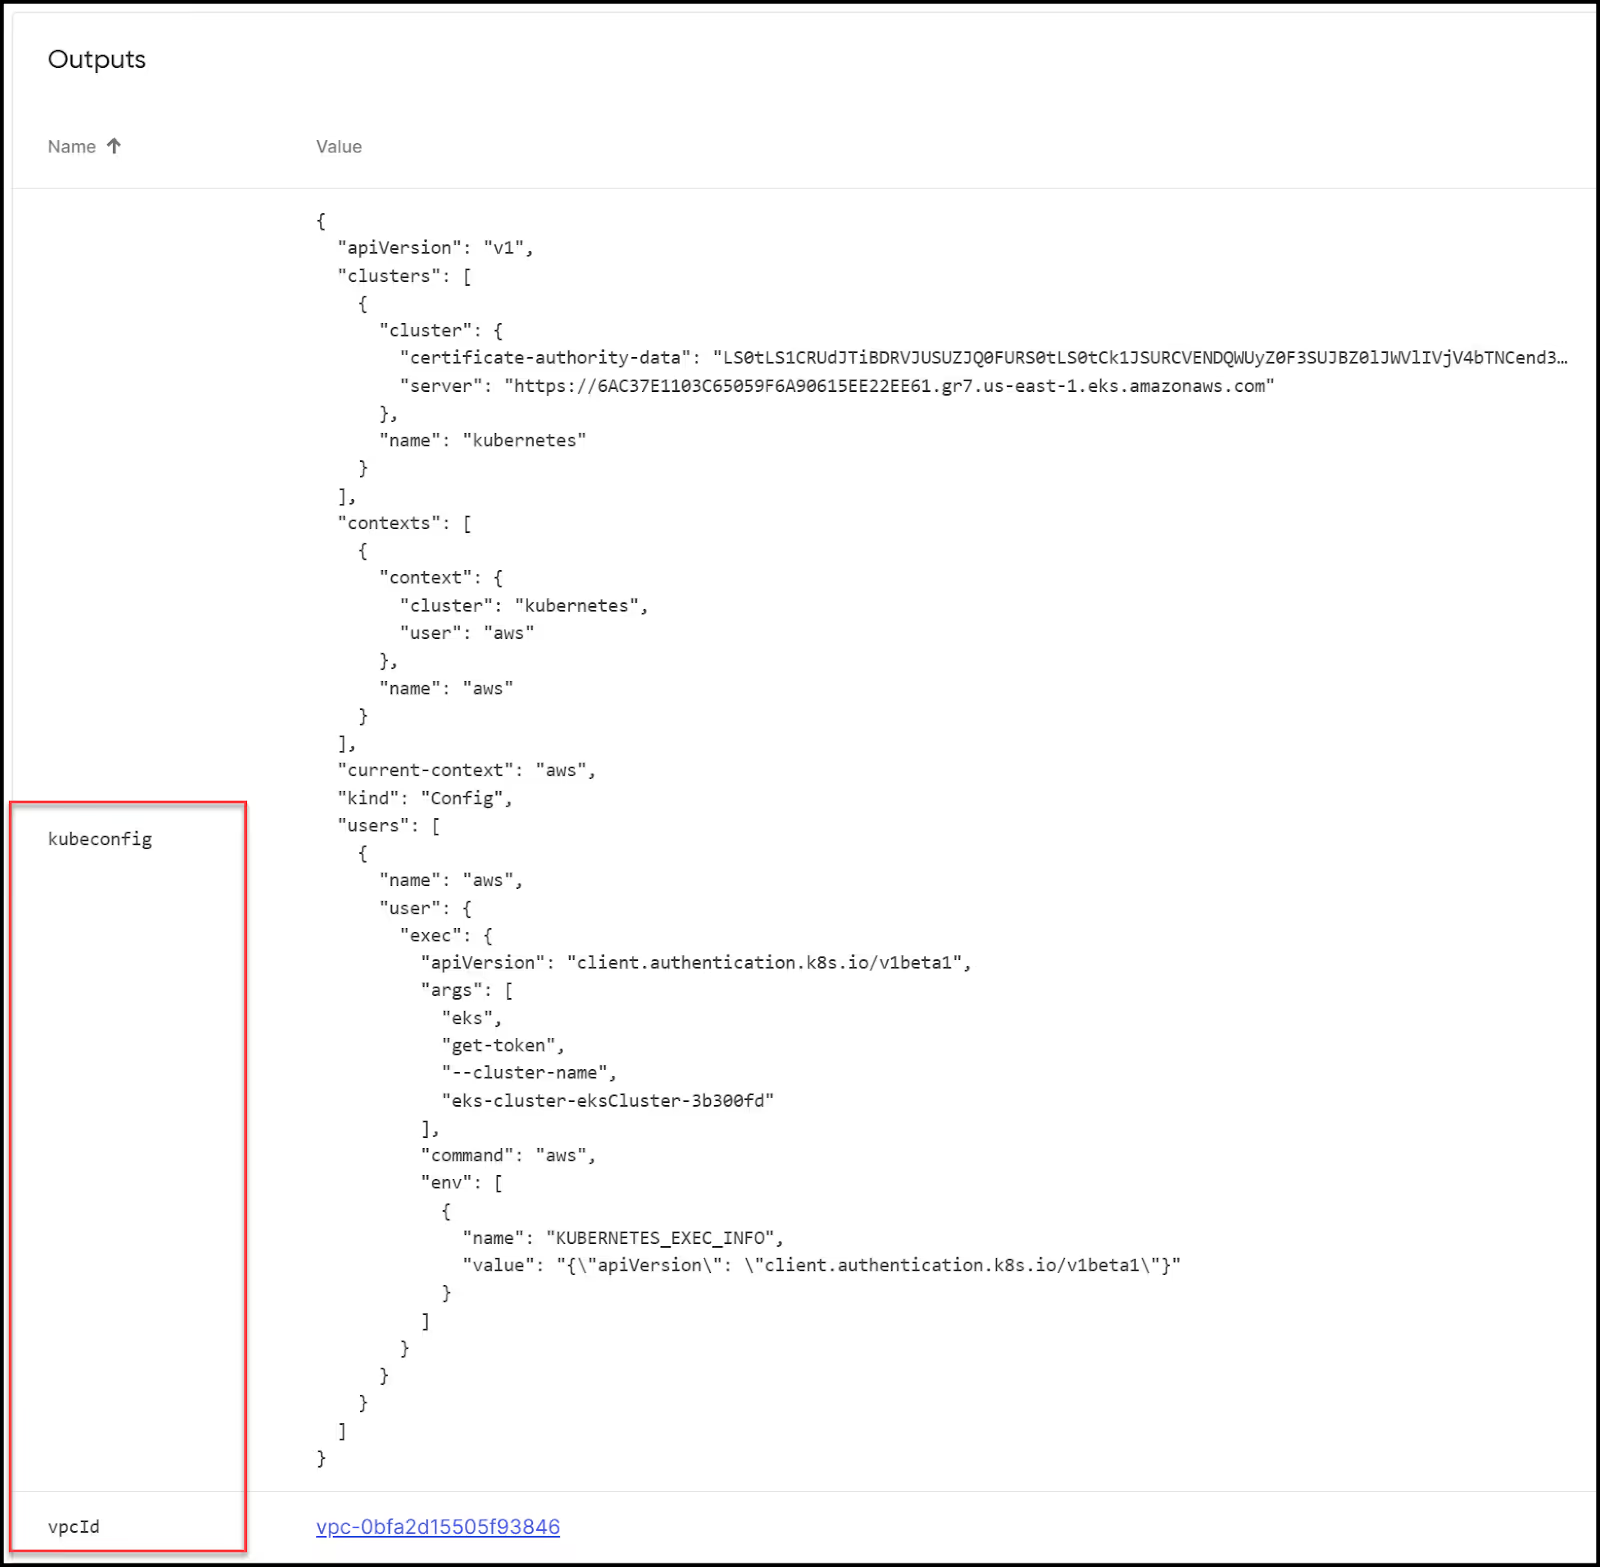
You can view the output in the UI or the CLI for the vpcId and the kubeconfig.
Access the EKS Cluster
To get the kubeconfig for the EKS cluster, run the following command:
Now run [.code]kubectl[.code] commands to interact with the EKS cluster:
Congratulations! You've successfully provisioned an EKS cluster in AWS.
Examine the Infrastructure Code
Take a look at the actual code that provisions our EKS cluster. Notice how it's written in simple Python. I could have built the cluster from scratch by calling on each resource, but why reinvent the wheel? There is an excellent Pulumi package called Amazon EKS in the Pulumi Registry. I decided to go with this.
As you see, in under 40 lines of code, we have our EKS cluster defined:.
Pulumi makes it very easy to choose between many languages right in the documentation.
If you need to tweak the cluster configuration, it's easy to do so with the very well-documented eks.Cluster package.
Pulumi Configuration Files
When we ran the [.code]pulumi new kubernetes-aws-python[.code] command, Pulumi 1) created a new folder for us, 2) downloaded dependencies in a virtual environment for Python, and 3) also created two config files.
Let's take a look at them now.
1. pulumi.yaml
This file acts as the manifest for your Pulumi project. It's a key part of the project configuration and provides metadata about the project itself.
Here's what each part of the content you've provided does:
- name – This is the name of your Pulumi project. When you run [.code]pulumi new[.code], it sets this name, and it's used as a default prefix for the resources Pulumi creates.
- runtime – This specifies the runtime environment that your Pulumi program is expected to run in. In your case, it's set to python, meaning the Pulumi CLI expects your Infrastructure-as-Code to be written in Python.
- options – These are additional settings related to the runtime environment.
- virtualenv – This option tells Pulumi to use a Python virtual environment located in the venv directory within your project directory. This is important for Python-based projects to ensure dependencies are isolated from other Python projects on the same system.
- description – This provides a human-readable description of what the Pulumi project does. It's a string that helps you and others understand the project's purpose at a glance.
So, when you initialize a new Pulumi stack or when Pulumi interacts with your project, it uses this file to understand the project structure, runtime requirements, and other metadata that influence how it deploys and manages your infrastructure resources.
2. pulumi.dev.yaml
When you run the pulumi new command and answer the setup wizard's questions, Pulumi automatically saves these answers as configurations in the pulumi.dev.yaml file. This file acts as a record of the initial setup parameters you specified for your project.
Now, if you enter commands or make changes at a different time (i.e., not during the initial Pulumi new setup) these changes won't automatically update the pulumi.dev.yaml file. Instead, you have two main alternatives for updating configurations after the initial setup:
1. Manual Editing – You can directly edit the pulumi.dev.yaml file to change or add configurations. This is like tweaking the settings of your project by hand.
2. Using Pulumi CLI Commands – You can use specific Pulumi CLI commands to update your configuration. For example, if you want to change the AWS region, you could use a command like [.code]pulumi config set aws:region us-west-2[.code]. This command updates the configuration in your pulumi.dev.yaml file without you having to manually edit the file.
Here is the content of the file:
To clean up simply run [.code]pulumi destroy[.code].
Pros and Cons of Using Pulumi
Pros
- Language Choice – Use your favorite programming language.
- Rich Ecosystem – Supports a ton of cloud providers.
- Dynamic Providers – Extend its capabilities as you see fit.
Cons
- Language Overload – Sometimes, choosing a language can be a burden.
- Learning Curve – If you're coming from dedicated DSL tools like Terraform's HCL, there might be an initial hump.
Pulumi Alternatives
The most obvious alternative to Pulumi is Terraform. But hey, keep an eye out for OpenTofu, an upcoming open-source alternative following a BSL license change. Crossplane is another alternative for those who enjoy building infrastructure using Kubernetes CRDs. Check out more details below.
1. Terraform
Overview: Terraform is a big player in the IaC field. It uses its own domain-specific language, HCL (HashiCorp Configuration Language), which is designed to describe infrastructure in a declarative way.
Why It's Popular: Terraform's been around for a while and has a huge community and support base. Plus, it works across many cloud providers, making it super versatile.
Key Differences from Pulumi: Unlike Pulumi, Terraform isn’t based on conventional programming languages. So, if you're not into learning HCL, it might be a bit of a curve.
2. Crossplane
Crossplane is perfect for those who are all-in with Kubernetes. It allows you to manage your infrastructure using Kubernetes CRDs (Custom Resource Definitions).
If you’re comfortable with Kubernetes and want to manage cloud resources as Kubernetes objects, Crossplane is your go-to. Being Kubernetes-focused, it fits well in ecosystems already heavy with Kubernetes usage and has a growing community.
Thoughts
Each of these alternatives has its own flavor. Terraform is the established giant with a dedicated language, OpenTofu promises to always be open-source along with new approaches to IaC, and Crossplane merges the worlds of Kubernetes and IaC.
Depending on your needs, comfort with certain technologies, and the specifics of your infrastructure, one of these might be a better fit for you than Pulumi.
Tutorial: Using Pulumi with env0
Now let's see how to use env0 to create the same Pulumi stack. We will create the same EKS cluster but this time by using env0 to trigger Pulumi.
Let's start by creating a new project in env0.

Next, you'll need to create a Pulumi template as shown:

Then connect to your VCS. Make sure to select the Pulumi folder, in our case Pulumi-EKS.

Under variables, add your PULUMI_ACCESS_TOKEN environment variable.

Then finally, make sure this template is deployable in our 'eks-demo' project.

AWS Cloud Provider Credentials
Make sure you have your AWS credentials set up in the Project settings

Create an Environment
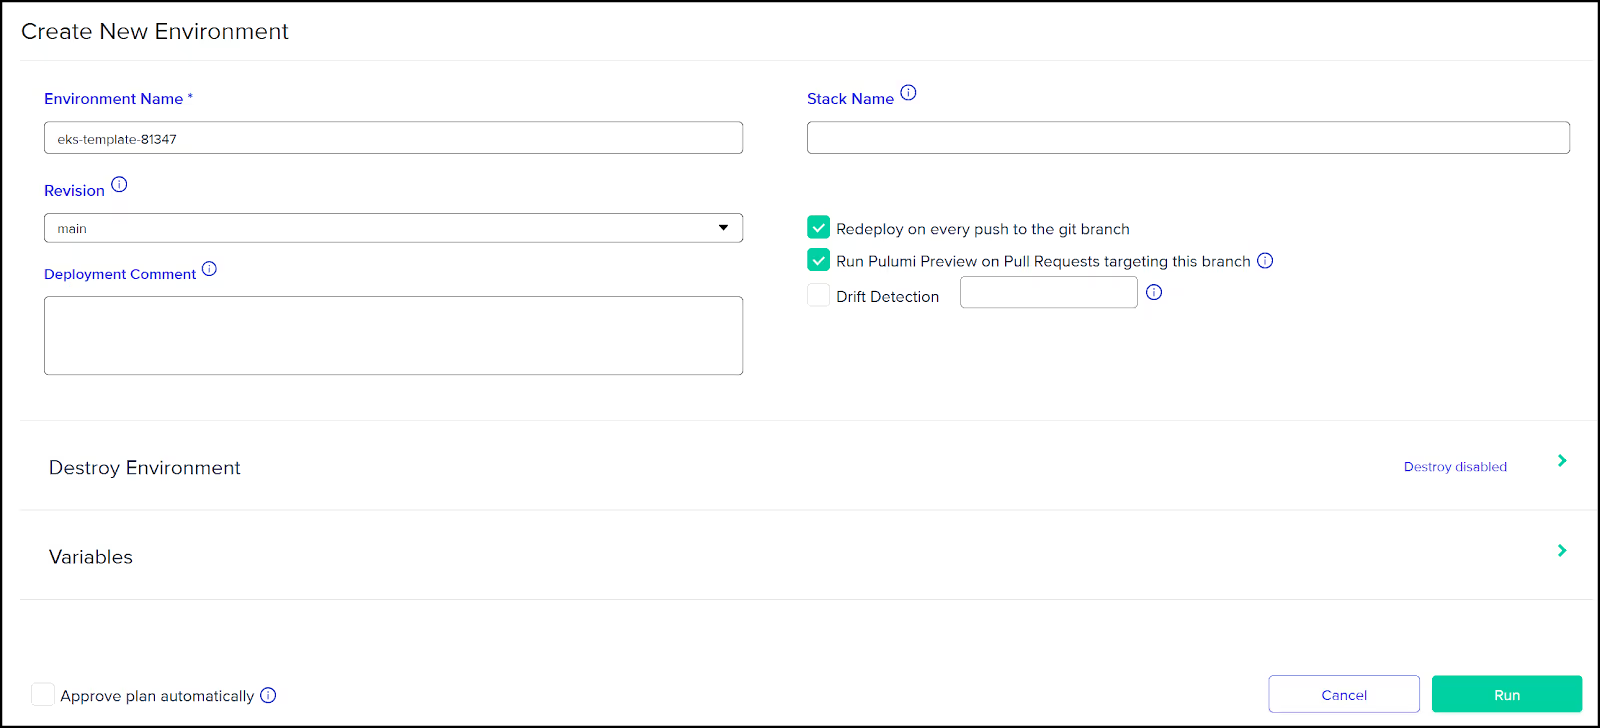
Now we're ready to create a new environment. Head over to 'Project Environments' then create a new e.
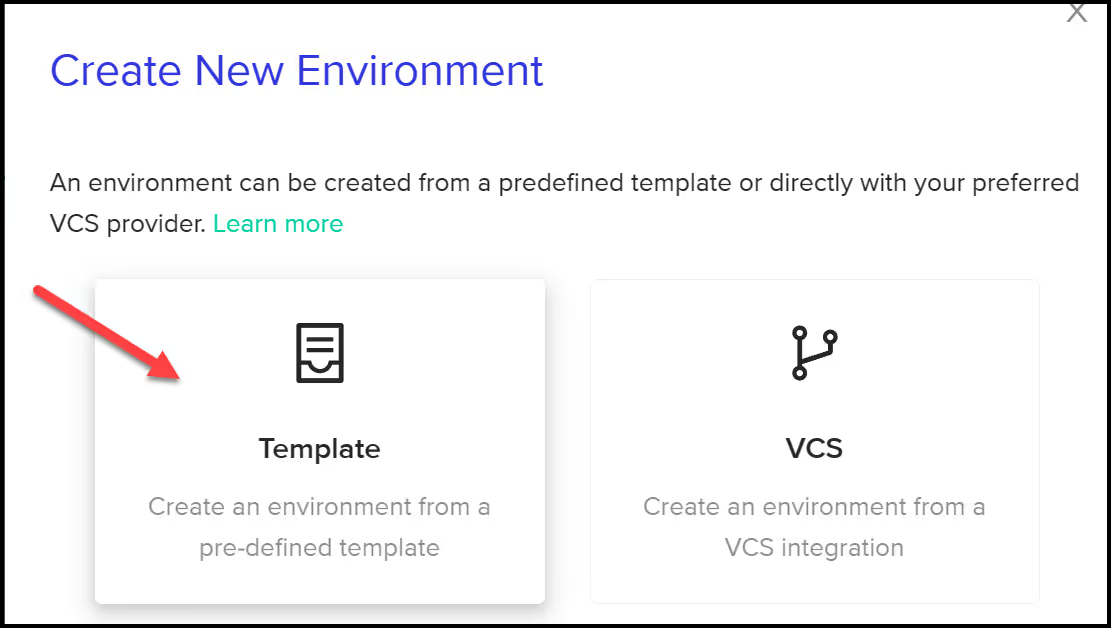
When you see the eks-template, click the 'Run Now' button. There are some options to use such as enabling drift detection and the ability to automatically destroy the environment. When you're ready click the Run button.
Notice in the deployment logs how we have a 'Before: Pulumi Preview' step. This is defined in the env0.yaml file at the root of our repo to provide our configuration variables.
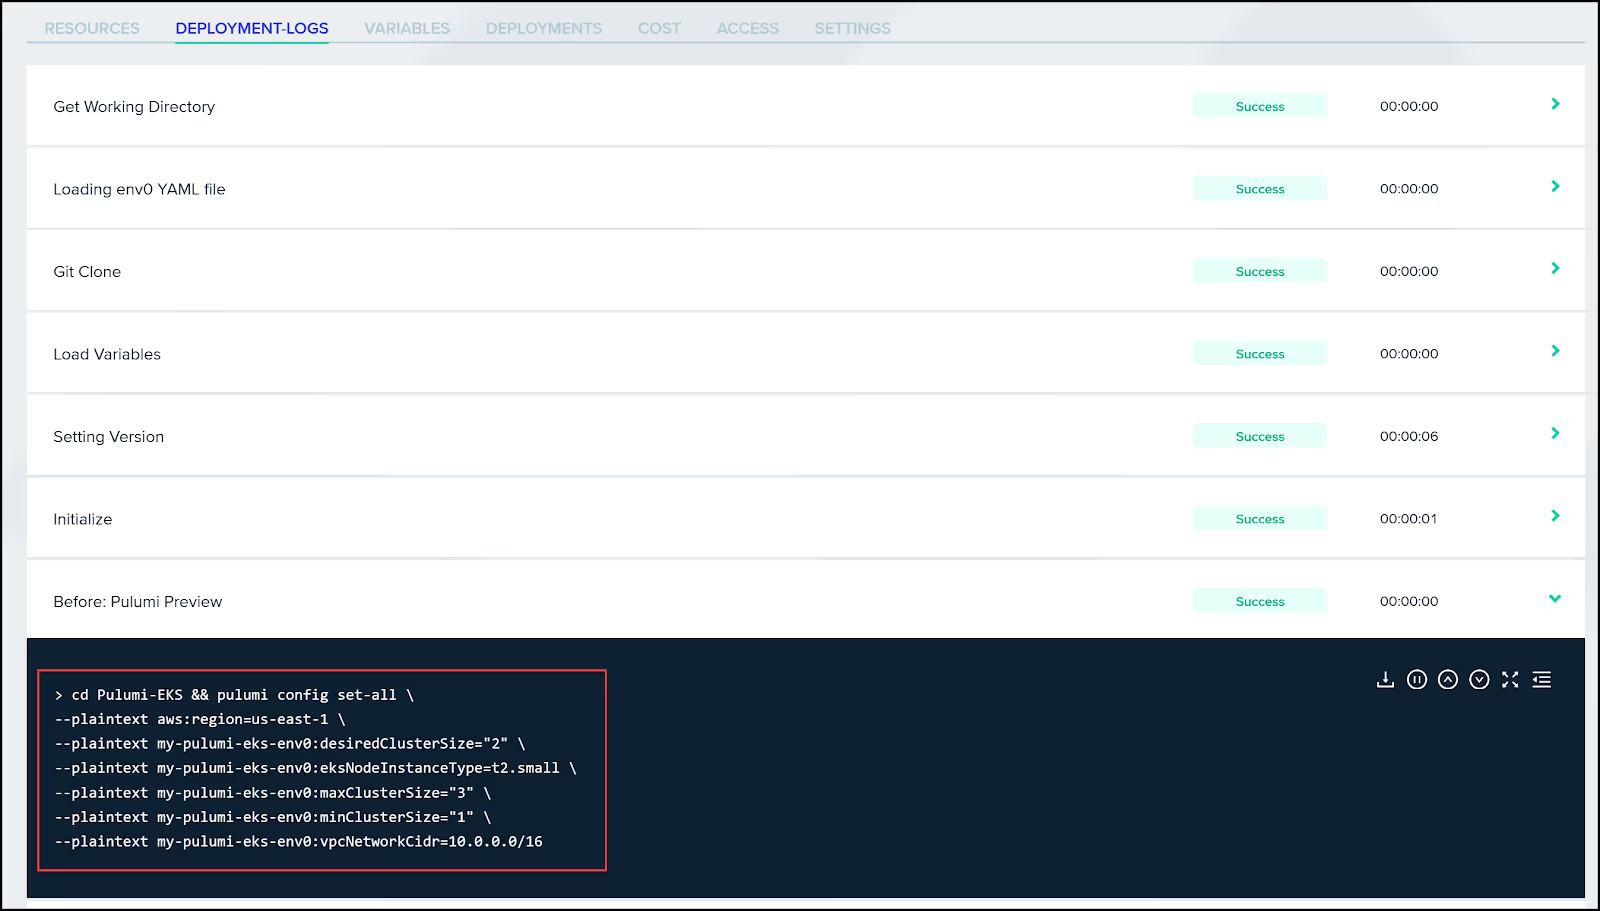
Below you can see how our env0.yaml looks like. Notice that we are specifying the same configuration variables that were in our pulumi.dev.yaml file.
If you left the option to approve the plan automatically unchecked, you will need to confirm the execution of the [,code]pulumi up[.code] command.
View the Output
Finally, once the deployment completes, you can view the outputs under the 'Resources' tab.
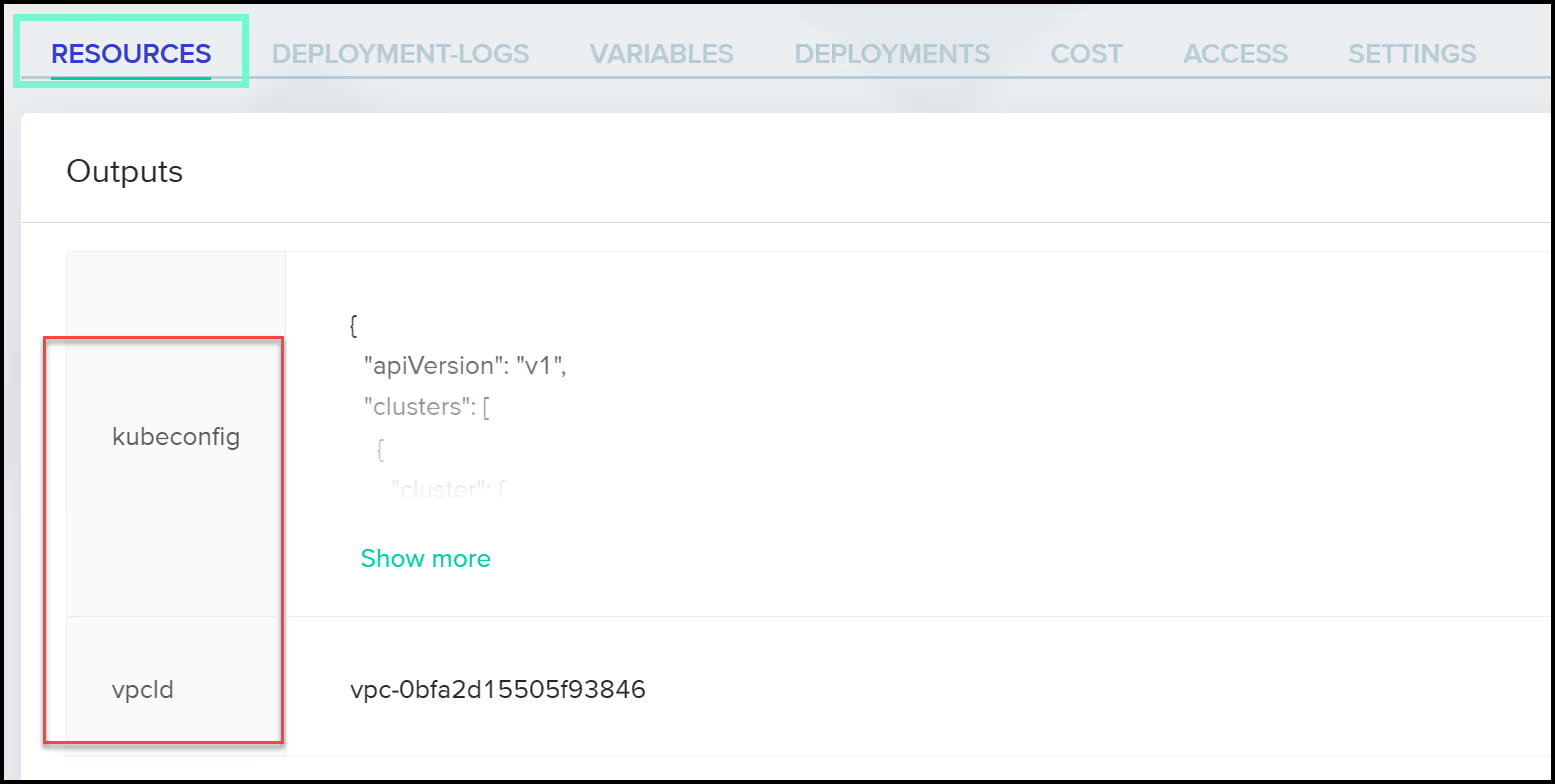
Once again, to access the Kubernetes cluster, you can simply save the kubeconfig in a file and export as an environment variable as shown below:
Congratulations! You've just used env0 to deploy the Pulumi stack and provision an EKS cluster, and it probably took less than 5 minutes.
To clean up, just click the 'Destroy' button. One click and it gone.

In Summary
We've covered a lot of ground in this post—from the nuts and bolts of what Pulumi is to its nifty features, and even how it plays nice with env0.
If you're in the DevOps or Platform Engineering space, Pulumi offers a refreshing take on infrastructure-as-code. By marrying traditional programming languages with cloud resources, you get a level of flexibility and power that’s hard to beat.
So, what's the takeaway? If you’re looking to step up your infrastructure game, Pulumi is worth a shot.
Not ready for your entire team to move from Terraform to Pulumi? That's the benefit of a framework agnostic IaC platform such as env0.
Here are some of the key features that I like about env0:
- Drift detection – env0 provides drift detection that can help you detect drifts and alert you about them automatically.
- Governance – our platform allows you to define custom policies and guardrails to both secure and keep your infrastructure compliant.
- Multiple frameworks – env0 supports multiple frameworks such as Pulumi, Terraform, OpenTofu, and more.
- Ephemeral environments – Developers can set up an environment with a timer to self-destruct reducing wasted resources.
- Flexibility – With pre- and post-hooks that reduce the need for a full external CI/CD pipeline.
For more information on env0's support of Pulumi, please reference this guide.

.webp)



.avif)