

.webp)


This is a screencast walkthrough demo of Continuous Deployment of a Python3 application, built with Terraform, using the env0 platform.
Transcript
Hi, I’m Tim Davis, DevOps Advocate with env0. Today, we're going to go over a demo of continuous deployment of an application into a vSphere environment. We're going to do this with a Python application that's hosted in GitHub, and we're going to build it using Terraform and the env0 platform.
Let's take a look at the application we're going to be working with here. So, we have a few files in here. We've got our `data.tf` file; we've got our `httpserver.pi` file which is our actual Python application; and we have our main outputs and `variables.tf` file. Now, we also have our ‘env0.yaml’ file here—this is going to be important to the env0 build because this is where we're going to set up our “before” and our “after” tasks so that we can say, or if we need to do anything before the build, or if we need to run any post-deployment steps, that's where we're going to go ahead and configure that.
Let's take a look at our `data.tf` file here. So, we're obviously going to be using the vSphere provider since we're going to be deploying into a VMware vSphere environment. We're going to create a single resource of a VMware vSphere virtual machine. It's going to have 2 vCPU and 1 GB of RAM to it. It's also going to have a network interface and a disk, and we're going to do this by cloning a template in our vSphere environment that we'll take a look at here in just a little bit.
If we look at our `data.tf` file, this is going to specify where in the environment we're going to deploy things—like what data store and what resource pool or what network we want it to be connected to. our `variables.tf` is where we're going to have our VM name and http server port. These variables are set up in the env0 environment, so I’ll show you that here in just a minute.
Then, we've got our `outputs.tf.` This is going to be what we're going to get from the run from Terraform. We're going to need to know the VM’s default IP address, and we're going to need to know the HTTP server address so that we can verify that the application is running properly.
So, let's go ahead and jump back to the front here and let's go take a look at the env0 platform and get that configured.
So, if we go to env0.com, we can go ahead and log into our environment. Now, this is going to load up the “Tim Demos” organization within the env0 platform. You can have as many organizations as you want. That way, you can go ahead and delineate different teams and anything like that.
Under the organizations, you're going to have your projects, so let's go ahead and jump into our default organization project here.
We have our project environments, our templates, our variables, and our settings. Above that, we have our organization, projects, templates, variables, and settings. Templates are set up at an organization level, and then you assign those templates to the projects.
So, let's take a look at our templates here - and we have one template built and this is going to be our vSphere template that we're going to use today.
If you hit “Review Code,” that'll jump you over to the configured GitHub repository or whichever other source repository you decide to use. We'll go ahead and hit “Settings” here now. Inside of this, we have our template name, which is “vSphere.” We have our GitHub repository, which is going to be the templates repository that I have on my GitHub. We have our Terraform folder—this is going to be the folder that we just looked at where our application and our Terraform files are.
We're not going to be using any specific SSH keys for this. We're not going to retry on failure because if we have a problem, we want to fix that before we start to deploy again. And, we're going to be using the master branch for this.
As far as the variables are concerned, we have two types of variables: we have Terraform variables, and we have environment variables. For the Terraform variables, we need to specify the VM name. Here we have “Tim Demo VM.” So, this is the name of the VM that's going to be deployed into our vSphere environment.
And then, we have our actual runner environment variables here. So, we're going to need things like the ssh password in order to get into the app.
The .tf variable of our HTTP server port—this is going to be set and then given back to us, then we have our vSphere password server and user. This way, we can go ahead and get into the environment and use those APIs from vSphere to connect in and make sure that our deployment works properly.
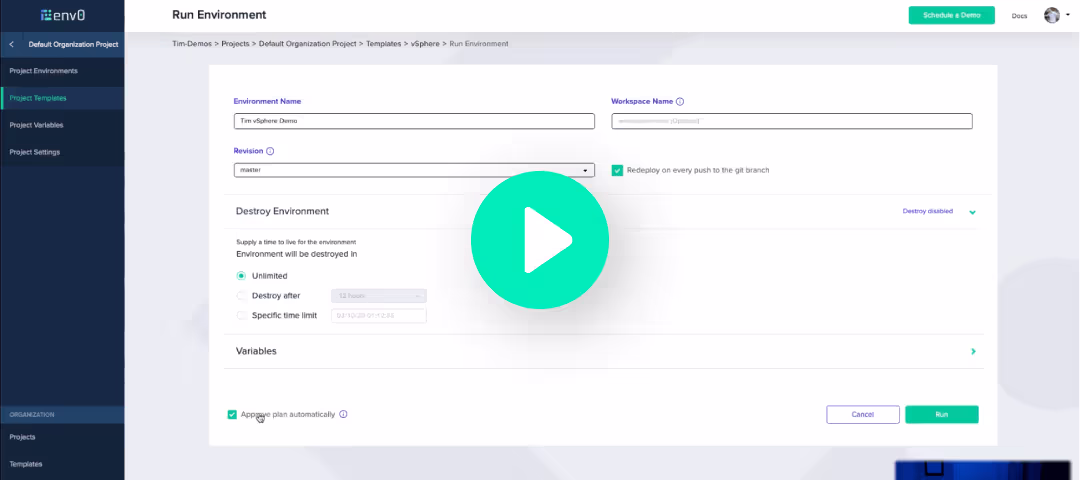
So, let's go ahead and go to our project environments and let's create a new environment. This is going to be an actual deployment. Let's go through and click that we're going to run now with our vSphere template. Let's call this “Tim vSphere Demo."
For an environment name, we're going to leave the workspace name “default” and let that pick one. Our revision is going to be “master” since we are doing continuous deployment. We want this to redeploy every time we make a change to the Git environment. We're going to go ahead and check redeploy on every push to the Git branch.
Then, we also have our “destroy” environment, so this is the time to live for your environments.
We'll go ahead and set that to “unlimited," because we don't want it to destroy itself after 12, 24, or however many days.
And then, of course, we have our variables that we just looked at. We're going to go ahead and use “approve plan” automatically for this, but if you want to just do a “what if” run so that you can see what kind of resources are going to be created, or if you want to have some kind of manual approval chain, then uncheck that and that's how you can make sure that it stops after it does the ‘plan’ phase.
Before it actually does the Terraform plot that way, you can make sure that you get that approval done, so we'll go ahead and click “run” and this is going to go ahead and start all of our procedures. It's going to pull the information down and it's going to do all of our planning phase. It's going to make sure that our pre and post scripts are all set up, and then it's going to go ahead and run that installation in the environment.
So, we'll notice it's taking us straight to the deployment logs we're doing—a Git clone and a Git Terraform state. We're loading that `env0.yaml` that has our pre and our post stages in that we're just doing a pip to install parameco. We're taking an environment variable and creating it for the IP address of the system, and then we actually start using Python 3 to start the HTTP server.
From there, we're going to load up our system variables and our Terraform variables. We're going to set the Terraform version, we're going to do an `init`, and we're going to set up the workspace. Then, we're going to tag resources.
Now—and this is important if you're using any form of cloud management platform—that way you can make sure that you're keeping your delineation of teams or workloads or types for any kind of resource that you are needing to tag for some purpose. This is where we're going to do that.
Now, we are using vSphere for this today—but if you're using AWS, Azure, or Google, and you're not really ready to jump into the env0 platform just yet but tagging is something that is important to you, we have an open source piece of software that's available for free today called Terratag.
Now you can go through and use that to tag all of your resources across any of the big three hyperscalers, and you can do that during the Terraform process. This way, it's all good to go—it works across those clouds so that you don't have to manually go and do that tagging update afterwards.
From there, we're going through to Terraform plan, then we're doing the apply, then after that it's going to go to the after and run our after script. It’s going to do the Terraform output and it's going to store the Terraform state. Since that's running, let's go ahead and take a look in our vSphere environment and see what's happening.
So, we can see here that we've got three tasks that have happened in our vSphere environment. We've got a “clone virtual machine,” “reconfigure virtual machine,” and “power on of the virtual machine.” We can see under our cluster, one under our host that we have “Tim Test VM” that's been built. So as far as this is concerned, everything should be working now. Everything should be up to date and running.
Let’s go back to env0 and take a look. It looks like everything's working. Our status for our environment is “active.” Everything's going, we have six resources and that's including the virtual data center and everything that's listed under there. Our revision is “master,” our template was “vSphere,” and we have our outputs here. This is going to be an important piece.
So, we set up those outputs in the Terraform files where we need that VM default IP address in the HTTP server. This is where we're going to get the address and be able to actually check on our application to make sure that it's working. Here, you can actually just come and click the URL and it'll allow you to copy that to the clipboard, so you can open it up or you can just right click on it and open in a new tab and this is going to load our application.
We see that everything's going great, it's running just fine. We can go ahead and refresh that. Everything is loading up and it seems to be responsive. Now, what happens if we want to go ahead and make an update to that? We want to test the continuous deployment portion of this and make sure that it is going to redeploy.
Let's go back and check out our `httpserver.pi`, and let's go in here and let's take out this little function here that we don't need. It's a comment, but either way it's going to be an update. We'll go ahead and commit those changes, and what this should do is this should actually go through the environment and start to redeploy it in env0. So, let's pull that up here and let's refresh and find out.
It looks like we are going through and we have a deploy in progress now, so that's great. We're going to go through and it's going to run all those steps again. It's not really going to make any huge changes as far as Terraform is concerned, because with Terraform if we're not actually changing the amount of servers that are deployed or any other infrastructure, it's not actually going to redeploy anything. It's just going to go through, and this will run our after script to redeploy our application with the changes that we have.
So, we've gone ahead and checked that out. Everything seems to be going; everything seems to be running. We'll go through and check our application here one more time, and everything's working!
This was just a quick demo of showing you how we can use continuous deployment into a vSphere environment using env0. For managing on-prem VMWare vSphere with Terraform and env0, check out our other tutorial. If you have any questions, feel free to reach out to us at hello@env0.com.


