

.webp)


In this tutorial we'll go over how to enable repeatable, effective, straightforward application deployments by automatically deploying Kubernetes resources to an Amazon EKS cluster.
During every application deployment plan, there are two primary questions that come up:
- What’s being deployed?
- How is it being deployed?
We’ll answer question 2 here.
When you’re figuring out the best method to deploy an application, it comes down to what is repeatable, effective, and straightforward. The last thing engineering teams want to do is manually run commands on their local terminal to get an application up.
In this blog post, you’ll learn how to automatically deploy Kubernetes resources to an EKS cluster using env0.
What is Amazon Elastic Kubernetes Service (AWS EKS)?
Amazon Elastic Kubernetes Service (AWS EKS) is a managed service to run Kubernetes on Amazon Web Services AWS cloud and on-premises.
Why automate application deployments?
Years ago, when engineers wanted to deploy an application to a server, it went something like this:
- Compile the binary
- Manually copy the binary to a server or multiple servers
- Manually run the binary with some command
- Ensure that the application is up and running
Today there are much more efficient methods to get this workflow configured.
The truth is, engineers don’t want to be bogged down by mundane, manual tasks and engineering leadership doesn’t want to waste time by manually deploying binaries to get an application up and running.
The whole idea behind automated and repeatable processes is to make engineers’ lives easier and have long-lasting deployments that are effective. Removing the manual effort and ensuring effective deployments are the primary reasons you want to use containerized applications and automate infrastructure deployments.
When it comes to Kubernetes applications, it’s far easier to automate a workload. Because an application is already containerized once it reaches the “Kubernetes phase”, the primary piece an engineer has to worry about is ensuring a proper Kubernetes Manifest is used with a valid container spec that will deploy applications and individual services.
Once the Kubernetes Manifest is valid, it can then be deployed. That’s where env0 comes into play.
Prerequisites
To follow along with the hands-on portion of this blog post, you will need:
- An env0 account (you can sign up for a trial here)
- A source control repo such as GitHub, to store the code in for deployment purposes (demo repo)
- An AWS account (you can sign up for a free trial/tier here)
- Credentials configured in your env0 environment for AWS
- An Amazon EKS cluster running (see our earlier post “Deploying Amazon Elastic Kubernetes Service (AWS EKS) with Terraform”) LINK
The Kubernetes resource
To automatically deploy a Kubernetes resource, you’ll need a Kubernetes resource to use. The below configuration is a Kubernetes Deployment resource/object that does the following:
- Specifies a Deployment
- Creates two replicas, which means two Pods will run for the Deployment
- Deploys the latest container image of NGINX
- Specifies that the container runs on port 80
Save the following Kubernetes Manifest in GitHub or another source control system to be used later with env0.
Setting up env0
While env0 is used a lot for Infrastructure as Code deployments, it's also fully compatible with Kubernetes containerized application deployments: a GitOps platform alternative to deploying manually.
Engineers don't want to in most cases deploy or run Kubernetes Manifests from their local computer. It’s neither scalable nor efficient. Also, it creates a major blocker in getting teams to work together on the deployments. At the same time, some organizations may not be ready to implement a true GitOps platform as it can be fairly complex and a heavy lift.
Deploying with env0 is a solid middle ground.
Creating the Kubernetes connection
Prior to deploying a resource/object to Kubernetes, you’ll need a way to connect to your Kubernetes clusters. This is where env0 configuration files come into play.
In the code below, you’ll see that there’s an [.code]aws eks[.code] command running that pulls down the kubeconfig on the environment that’s being created via env0. This way, you have the ability to connect to the Kubernetes cluster.
apiVersion: apps/v1
kind: Deployment
metadata:
name: nginx-deployment
spec:
selector:
matchLabels:
app: nginxdeployment
replicas: 2
template:
metadata:
labels:
app: nginxdeployment
spec:
containers:
- name: nginxdeployment
image: nginx:latest
ports:
- containerPort: 80
You’ll want to store this code in the same repository as the NGINX configuration in the previous section and call the file [.code]env0.yaml[.code].
Your Git repository should look like the screenshot below, which shows the [.code]nginx.yaml[.code].
Once the code setup is complete, you can create variables for the [.code]nginx.yaml[.code] and the [.code]env0.yaml[.code] in the same repository. [.code]AWS_DEFAULT_REGION[.code] and [.code]CLUSTER_NAME[.code] that contains the appropriate values. For example, below the values show
that the cluster name is [.code]k8senv-cluster[.code] and it’s deployed in [.code]us-east-1[.code].
Ensure that you create environment variables for this configuration and not Terraform variables as in the screenshot below.

Creating the environment
Inside the project of your choosing, click the green + CREATE NEW ENVIRONMENT button.

You have two options when creating an environment:
Template
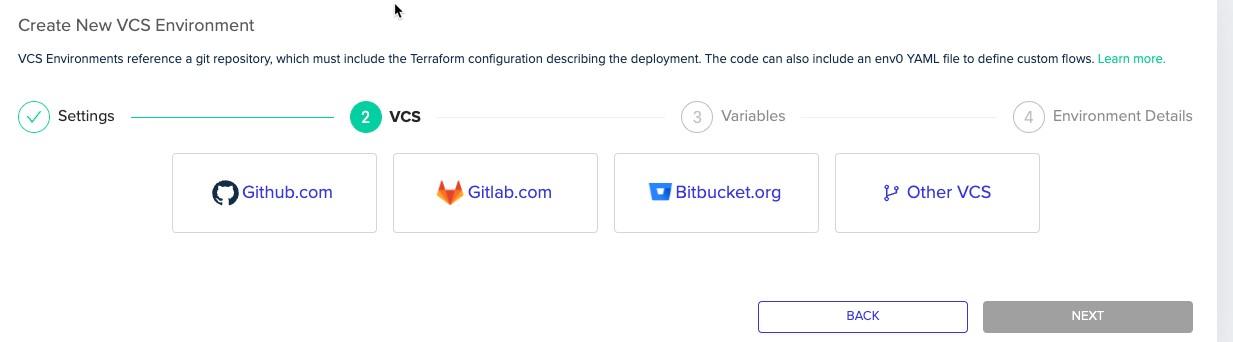
VCS
VCS pulls the Terraform configuration directly from GitHub. Choose the VCS option as that’s where the Kubernetes Manifest for resource creation exists.

Next, choose Kubernetes as the IaC type and click next.

Choose the source control system in which you stored the Terraform code.
When you choose a source control system, you’ll be prompted to authenticate to it.
Once authenticated, you’ll be able to choose the repo where the Kubernetes Manifest exists along with the branch name.

On the variables page, you should see that the variables you created in the previous section are shown.

Give your environment a name and click DONE.

Deploying the Kubernetes resource
Once the environment is created in the previous section, you’ll see that the deployment has started.

Once complete, you should see that all steps were successfully deployed.
You can also see in the “K8S Apply” step that the NGINX resource was created.

You can also confirm that the Nginx configuration was created by running the following command against the Kubernetes cluster: [.code]kubectl get pods[.code]
The output should be similar to the screenshot below.

Congratulations! You've deployed Kubernetes clusters running your containerized applications!
This is part three of a four-part series. Keep reading to learn more!

.png)


.avif)
.png)